Dominando Fotografia e Staging Imobiliário: Seu Guia Completo para Anúncios
Um guia completo de fotografia e staging imobiliário — desde configurações da câmera até a ordem das fotos no seu anúncio.
Por que fotos de alta qualidade são essenciais para anúncios imobiliários?
No mercado digital de hoje, a primeira visita a um imóvel quase sempre acontece online. A fotografia imobiliária de alta qualidade não é apenas um luxo; é uma necessidade que impacta diretamente o interesse do comprador, o valor percebido e, em última análise, a velocidade da venda. Fotos profissionais fazem um imóvel se destacar em resultados de busca lotados, capturando atenção e atraindo potenciais compradores para uma análise mais detalhada. Elas criam uma conexão emocional antes de uma visita física, mostrando não apenas uma casa, mas um lar em potencial. Anúncios com fotografias de alta qualidade podem vender até 32% mais rápido do que aqueles com imagens de baixa qualidade, e frequentemente por um preço mais alto.
Fundamentos da fotografia que todo agente deve saber para visuais impressionantes
Ótimas fotos de anúncios começam com três elementos fundamentais que estabelecem a base para uma apresentação profissional: uma lente grande-angular, um tripé robusto e o momento estratégico para iluminação ideal.
### Escolhendo o equipamento certo: Câmera, lente e tripé
Para capturar fotos de interiores amplas, uma lente grande-angular é indispensável. Em uma câmera full-frame, uma distância focal entre 16-24mm é ideal, permitindo capturar mais do cômodo sem distorção excessiva. Se estiver usando uma câmera com sensor cropado, procure uma lente que forneça uma visão grande-angular equivalente (por exemplo, uma lente 10-18mm). Essa perspectiva mais ampla faz com que os cômodos pareçam maiores e mais convidativos, proporcionando uma melhor sensação de espaço.
Um tripé robusto é igualmente crítico. Ele garante imagens nítidas ao eliminar a tremulação da câmera, especialmente em condições de pouca luz onde são necessários tempos de exposição mais longos. Também permite um posicionamento consistente da câmera entre as fotos, o que é crucial para criar tours virtuais coesos ou para mesclar múltiplas exposições (HDR).
### Dominando a luz natural e artificial
A hora certa do dia influencia profundamente o humor e a qualidade de suas fotos. A hora dourada — a hora após o nascer do sol ou antes do pôr do sol — proporciona uma luz quente e lisonjeira que faz os interiores brilharem e os exteriores se destacarem com cores ricas. No entanto, para fotos de interiores, a luz solar direta pode ser uma faca de dois gumes, frequentemente criando sombras duras e janelas estouradas. Dias nublados, na verdade, produzem a iluminação interior mais uniforme, difundindo a luz solar lindamente e minimizando contrastes acentuados.
Quando a luz natural não for suficiente, acenda estrategicamente todas as luzes da casa. Use luminárias, lustres e iluminação sob os armários. Embora isso possa parecer excessivo a olho nu, a câmera frequentemente precisa dessa iluminação adicional para clarear as sombras e criar uma atmosfera mais convidativa.
### Configurações essenciais da câmera e técnicas de composição
Além do equipamento, entender as configurações básicas da câmera e as regras de composição elevará sua fotografia.
- **Abertura (f-stop):** Para fotografia imobiliária, geralmente você deseja que a maior parte do cômodo esteja em foco, então uma abertura maior (por exemplo, f/8 a f/11) é recomendada. Isso proporciona uma maior profundidade de campo. - **ISO:** Mantenha seu ISO o mais baixo possível (por exemplo, 100-400) para minimizar ruído e granulação, especialmente ao usar um tripé. - **Velocidade do Obturador:** Ajuste a velocidade do obturador para obter a exposição correta, compensando a abertura e o ISO escolhidos. Um tripé permite velocidades de obturador mais longas sem desfoque. - **Balanço de Branco:** Garanta que as cores estejam precisas. Use as predefinições de balanço de branco da sua câmera (por exemplo, 'Luz do Dia', 'Nublado', 'Tungstênio') ou balanço de branco personalizado para evitar tons de cor não naturais.
Para composição, fotografe dos cantos sempre que possível, mirando diagonalmente pelo cômodo. Isso maximiza o espaço visível, cria linhas de condução e adiciona profundidade à imagem. Ajuste a altura da câmera em cerca de 1,20 metro — aproximadamente na altura do peito — o que proporciona a perspectiva mais natural, imitando como uma pessoa veria o cômodo ao ficar de pé. Fotografar muito baixo faz os cômodos parecerem distorcidos e pode enfatizar tetos, enquanto fotografar muito alto os faz parecer pequenos e pode mostrar muito chão. Empregue a regra dos terços para posicionar elementos interessantes ao longo de linhas de interseção, criando uma imagem mais equilibrada e envolvente.
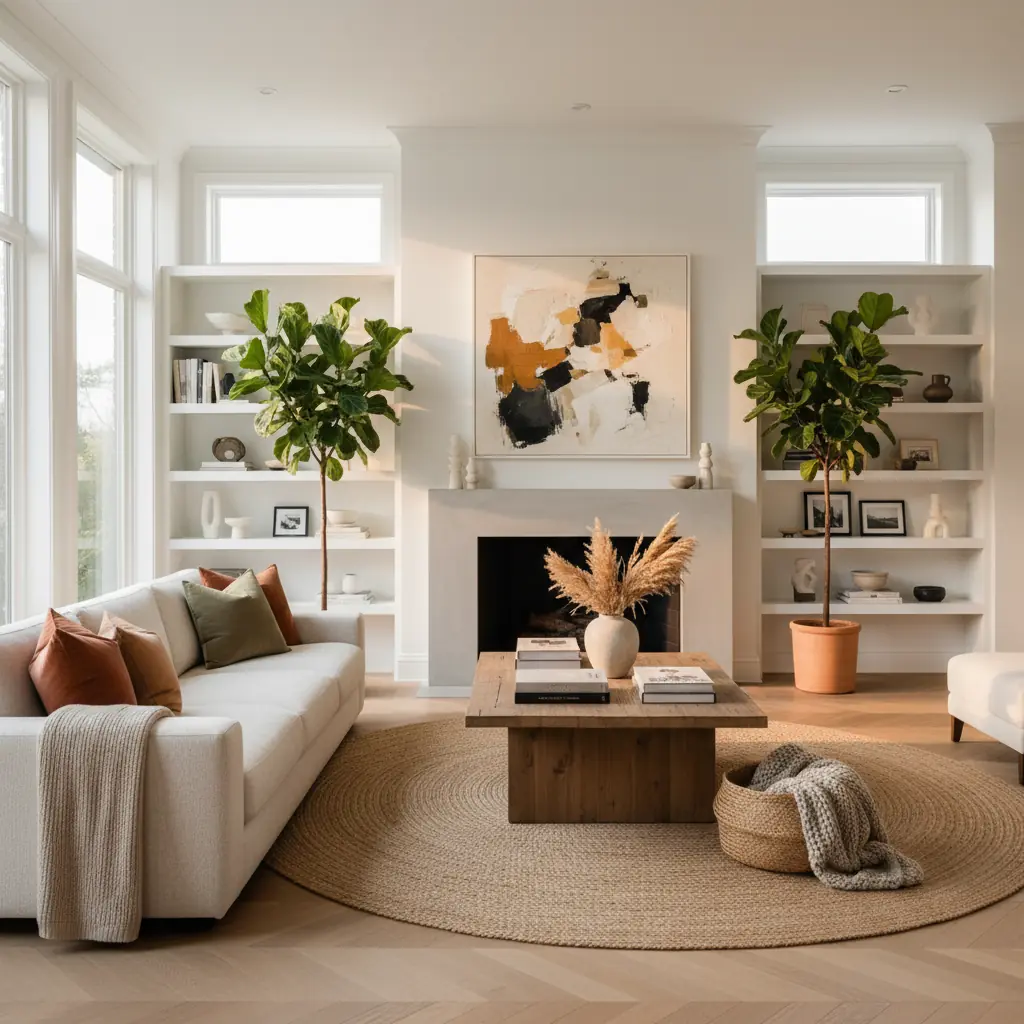
Preparando os cômodos para a câmera: A arte do staging e da organização
O que parece bom pessoalmente muitas vezes fica terrível nas fotos. A câmera é menos tolerante que o olho humano e acentua a bagunça e as imperfeições. Uma preparação minuciosa é fundamental.
### A lista de verificação pré-fotografia: Organizar, limpar e despersonalizar
Antes mesmo de pensar em tirar uma foto, prepare meticulosamente cada espaço:
- **Organize implacavelmente:** Remova todos os pequenos eletrodomésticos das bancadas da cozinha, esvazie as pias dos banheiros e guarde itens pessoais como correspondências, controles remotos e revistas. A bagunça escondida (dentro de armários ou gavetas) está ok, mas tudo o que estiver visível deve ser minimizado. - **Faça uma limpeza profunda:** Um lar impecável sinaliza boa manutenção. Limpe janelas, pisos, bancadas e eletrodomésticos. - **Despersonalize:** Remova fotos de família, itens religiosos e decoração muito pessoal. Os compradores precisam se imaginar morando no espaço, e muita bagunça pessoal dificulta isso. - **Pequenos reparos:** Conserte torneiras vazando, substitua lâmpadas queimadas e retoque a pintura descascada. Esses pequenos detalhes podem fazer uma grande diferença na percepção geral da condição da casa.
### Styling estratégico: Melhorando o apelo com toques sutis
Uma vez organizado e limpo, realce o apelo do cômodo com styling estratégico:
- **Cozinhas:** Feche todas as tampas dos vasos sanitários, desligue todas as TVs e telas de computador (elas criam reflexos que distraem) e esconda todos os cabos e fios visíveis. Arrume cada cômodo com um ou dois toques de estilo de vida: um livro aberto na mesa de cabeceira, uma tábua de corte com ervas frescas ou uma tigela de frutas frescas na cozinha, uma manta dobrada no sofá. - **Banheiros:** Certifique-se de que as tampas dos vasos sanitários estejam fechadas, as toalhas estejam recém-dobradas e penduradas de forma organizada, e todos os produtos de higiene pessoal estejam fora de vista. Adicione uma planta decorativa simples ou uma vela perfumada para uma sensação de spa. - **Salas de Estar:** Arrume os móveis para maximizar o fluxo e as áreas de conversação. Use almofadas e mantas para adicionar textura e cor. Considere um vaso de flores frescas em uma mesa de centro. - **Quartos:** Arrume as camas impecavelmente, com lençóis impecáveis e travesseiros fofos. Abra bem as cortinas para deixar entrar a luz natural. - **Pisos:** Remova tapetes e carpetes pequenos que podem parecer desorganizados ou criar ângulos estranhos em fotos grande-angulares.
Acenda todas as luzes da casa e abra todas as persianas e cortinas. Mesmo que o cômodo pareça "claro o suficiente" para seus olhos, as fotos se beneficiam da luz máxima, criando uma sensação arejada e espaçosa.
Ética na edição de fotos: Aprimoramento vs. representação enganosa
A edição digital é uma ferramenta poderosa, mas vem com limites éticos. O objetivo é aprimorar, não enganar.
### O que é aceitável na edição de fotos imobiliárias?
A edição básica é esperada e aceitável, pois esses ajustes visam a precisão e o apelo visual sem alterar a natureza fundamental do imóvel:
- **Correção de Balanço de Branco:** Ajustar as cores para parecerem naturais, removendo tons amarelados ou azulados. - **Correção de Distorção da Lente:** Corrigir a distorção em barril de lentes grande-angulares para fazer as linhas parecerem retas. - **Ajuste de Brilho/Contraste:** Clarear sombras, escurecer realces e ajustar a exposição geral para tornar a imagem clara e vibrante. - **Realce de Janelas (Mesclagem HDR):** Combinar múltiplas exposições para revelar tanto o interior do cômodo quanto a vista externa pelas janelas, prevenindo céus estourados ou interiores escuros. Esta é uma prática padrão e representa com precisão o que o olho humano veria. - **Remoção de objetos menores:** Remover um item pequeno e não permanente, como um cabo de energia solto ou uma placa temporária.
Essas são práticas padrão que representam com precisão o imóvel em sua melhor luz.
### Onde traçar a linha: Evitando a representação enganosa
Remover características permanentes, alterar elementos estruturais ou ocultar danos cruza a linha da representação enganosa. Isso inclui:
- Remover postes de energia, edifícios vizinhos ou elementos permanentes desagradáveis fora do imóvel. - Remover digitalmente uma fundação rachada, manchas de água, mofo, grandes buracos ou outros danos significativos. - Adicionar características que não existem (por exemplo, uma lareira, uma árvore grande, uma nova luminária). - Alterar o tamanho ou a escala dos cômodos ou características.
A regra geral: se um comprador notaria a diferença durante uma visita, você foi longe demais. A representação enganosa de um imóvel pode levar a problemas legais, prejudicar a reputação de um agente e, em última análise, desperdiçar o tempo dos compradores. Sempre priorize a transparência.
Staging virtual para espaços vazios ou desatualizados: Desbloqueando o potencial
Cômodos vazios não ficam bem em fotos. Sem móveis para escala, os compradores não conseguem avaliar os tamanhos dos ambientes, e casas vazias frequentemente parecem frias, pouco convidativas e sem imaginação. O staging virtual resolve esse desafio, transformando espaços vazios em lares quentes e mobiliados, ou exibindo o potencial de ambientes desatualizados.
### Os benefícios do staging virtual
O staging virtual oferece vantagens significativas sobre o staging físico tradicional:
- **Custo-benefício:** O staging virtual custa uma fração do staging físico, que pode chegar a milhares de dólares em aluguel e montagem de móveis. Um projeto típico de staging virtual pode custar de US$ 30 a US$ 100 por imagem, em comparação com US$ 500 a US$ 5.000+ para o staging físico. - **Flexibilidade:** Altere facilmente estilos, cores e arranjos de móveis para atrair diferentes perfis de compradores sem esforço físico. - **Velocidade:** Ferramentas modernas de IA produzem resultados que são quase indistinguíveis da fotografia real em questão de minutos ou horas, em vez de dias ou semanas para o staging físico. - **Acessibilidade:** Perfeito para casas em locais remotos ou que precisam ser anunciadas rapidamente.
### Transformando casas vazias com IA
Ferramentas modernas de IA revolucionaram o staging virtual. Plataformas como Habitas podem pegar a foto de um cômodo vazio e preenchê-lo com móveis e design elegantes e realistas que combinam com a estética escolhida. Isso ajuda os compradores a se visualizarem no espaço, a entenderem sua escala e a sentirem uma conexão. Estudos mostram que 73% dos compradores de imóveis dizem que o staging os ajuda a visualizar uma propriedade como seu futuro lar, e o staging virtual alcança esse impacto sem os obstáculos logísticos dos móveis físicos. Para um mergulho mais profundo em como a IA torna isso possível, explore nosso guia sobre [como funciona o design de interiores com IA](/blog/ai-interior-design-how-it-works).
### Visualizações de redesign para espaços desatualizados, mas habitáveis
Para espaços desatualizados, mas habitáveis – pense em bancadas verde-abacate, paredes com painéis de madeira ou carpetes felpudos – uma abordagem diferente funciona bem. Fotografe o cômodo existente como está e, em seguida, use ferramentas como Habitas para gerar visualizações de redesign. Essas ferramentas podem atualizar digitalmente elementos como cores de pintura, pisos, armários e móveis, mostrando aos compradores o potencial do imóvel.
Emparelhar fotos "atuais" com renderizações "possíveis" ajuda os compradores a verem além dos problemas estéticos e focarem no potencial da casa. Isso oferece uma visão do que o espaço _poderia_ ser, inspirando confiança e permitindo que estimem o potencial de renovação sem ter que imaginá-lo do zero. Essa estratégia é particularmente eficaz porque aborda as objeções comuns dos compradores de forma antecipada e lhes dá um caminho claro para modernizar a casa. Para ver o poder dessas transformações, confira [exemplos de antes e depois de design de interiores com IA](/blog/ai-interior-design-before-and-after).
Quantas fotos um anúncio deve ter e em que ordem?
O número e a ordem das fotos são cruciais para manter o engajamento do comprador e transmitir a narrativa do imóvel de forma eficaz.
### O número ideal de fotos de anúncio
Pesquisas de grandes plataformas imobiliárias como Redfin e Zillow mostram consistentemente que anúncios com 25 a 35 fotos recebem o maior engajamento. Essa faixa oferece um tour visual abrangente sem sobrecarregar o comprador.
- Menos de 20 fotos sugere que o agente está escondendo algo ou não capturou completamente a essência do imóvel. - Mais de 40 fotos pode criar fadiga e diluir o impacto — os compradores frequentemente param de prestar atenção após a foto 35, especialmente se muitas imagens forem redundantes ou de características menores.
Busque uma seleção curada que destaque cada área chave e característica única.
### Criando uma sequência de fotos atraente
A ordem das fotos importa enormemente. A sequência deve contar uma história, movendo-se logicamente pelo imóvel como se fosse um tour guiado.
1. **Comece com sua melhor foto externa:** Esta é frequentemente a frente da casa, capturada em um momento ideal (por exemplo, hora dourada), exibindo o apelo visual, o paisagismo e a impressão geral. Esta é a sua "foto de destaque" e geralmente responde por cerca de 60% dos cliques. 2. **Faça a transição para os principais espaços de convivência internos:** Siga com a sala de estar, depois a cozinha, depois o quarto principal. Esses são os cômodos mais importantes para os compradores. 3. **Agrupe os cômodos logicamente:** Apresente todas as fotos da cozinha juntas, depois todas as fotos da sala de jantar, depois todas as fotos do banheiro. Isso cria um fluxo suave e evita a desorientação. 4. **Inclua espaços essenciais:** Não se esqueça dos quartos secundários, banheiros de hóspedes, home offices e áreas de serviço. 5. **Destaque características únicas:** Mostre quaisquer detalhes arquitetônicos especiais, embutidos ou tecnologia de casa inteligente. 6. **Termine com as amenidades externas:** Conclua com fotos do quintal, piscina, pátio, garagem e quaisquer características da comunidade.
As cinco primeiras fotos são as mais cruciais, determinando se um comprador clica em "Agendar Visita" ou passa para o próximo anúncio. Elas devem ser cativantes o suficiente para prender o espectador imediatamente.
Contratar um fotógrafo ou fazer você mesmo: Fazendo a escolha certa
Decidir se deve contratar um profissional ou encarar a fotografia imobiliária por conta própria depende de vários fatores, incluindo seu orçamento, o valor do imóvel e seu nível de habilidade pessoal.
### Quando investir em um fotógrafo imobiliário profissional
Fotógrafos imobiliários profissionais geralmente cobram de US$ 150 a US$ 500 por imóvel e entregam de 25 a 40 imagens editadas profissionalmente em 24 a 48 horas. Para qualquer anúncio acima de US$ 300 mil, este é um investimento óbvio e altamente recomendado. O custo é insignificante em relação à comissão potencial e ao impacto significativo no preço e na velocidade da venda. Imóveis com staging e fotografia profissional podem vender por 6-10% a mais do que imóveis comparáveis sem staging.
Profissionais trazem não apenas equipamentos de alta qualidade, mas também habilidades especializadas em composição, iluminação e pós-processamento (incluindo a complexa mesclagem HDR para janelas). Eles entendem como fazer um cômodo parecer o seu melhor e como aprimorar eticamente as imagens para atrair compradores. Sua expertise garante qualidade consistente, economizando seu tempo e estresse, e, em última análise, gerando mais leads. Ao considerar o retorno sobre o investimento, um fotógrafo profissional é quase sempre uma despesa que vale a pena para propriedades de maior valor.
### Dicas para o agente imobiliário que fotografa por conta própria
Se você está fotografando anúncios por conta própria, especialmente para propriedades de menor preço ou se está apenas começando, investir em uma câmera mirrorless usada com uma lente grande-angular é uma jogada inteligente (custo total em torno de US$ 600 a US$ 800). Mesmo as melhores câmeras de celular não conseguem igualar a faixa dinâmica, o desempenho em baixa luz e a verdadeira perspectiva grande-angular de uma câmera dedicada com uma lente adequada.
No entanto, a técnica importa mais do que o equipamento. Um iPhone ou Samsung moderno nas mãos certas superará uma DSLR nas mãos erradas. Se você está seguindo a rota "faça você mesmo":
- **Aprenda seu equipamento:** Entenda as configurações da sua câmera (abertura, ISO, velocidade do obturador) e pratique. - **Use um tripé:** Essencial para fotos nítidas e consistentes. - **Domine a iluminação:** Evite flash direto e sombras duras. Maximize a luz natural e acenda todas as luzes internas. - **Edite com cuidado:** Aprenda softwares básicos de edição de fotos para corrigir o balanço de branco, a exposição e a distorção da lente. Siga rigorosamente as diretrizes éticas. - **Estude trabalhos profissionais:** Observe anúncios de alto nível para inspiração em composição, staging e iluminação.
Em última análise, quer você contrate um profissional ou faça por conta própria, o objetivo permanece o mesmo: criar imagens impressionantes e verdadeiras que cativem os compradores e mostrem todo o potencial de cada imóvel.
Perguntas Frequentes
### Qual é a dica mais importante para fotografia imobiliária?
A dica mais importante é priorizar boa iluminação e fotos amplas e limpas. Maximize a luz natural abrindo todas as persianas e cortinas, acenda todas as fontes de luz artificial e fotografe com uma lente grande-angular de uma perspectiva de canto na altura do peito (cerca de 1,20 metro). Esses elementos se combinam para fazer os cômodos parecerem mais espaçosos, convidativos e representados com precisão.
### Quanto custa a fotografia imobiliária profissional?
A fotografia imobiliária profissional geralmente custa entre US$ 150 e US$ 500 por imóvel, dependendo do tamanho da casa, localização e experiência do fotógrafo. Essa taxa geralmente inclui 25-40 imagens digitais editadas entregues em 24-48 horas. Para anúncios acima de US$ 300.000, esse investimento frequentemente se paga em vendas mais rápidas e ofertas mais altas.
### O staging virtual é ético e eficaz?
Sim, o staging virtual é ético e altamente eficaz quando divulgado corretamente. Ele transforma espaços vazios ou desatualizados em visuais quentes e atraentes, ajudando os compradores a visualizarem o potencial de um imóvel e como eles poderiam morar nele. É particularmente útil para casas vazias ou aquelas que precisam de reforma significativa. Estudos mostram que imóveis com staging virtual recebem significativamente mais interesse e vendem mais rápido do que propriedades vazias sem staging. Sempre inclua um aviso de que as imagens são com staging virtual.
### Quais são os maiores erros a evitar na fotografia imobiliária?
Os maiores erros incluem iluminação inadequada (muito escura, sombras duras), imagens borradas, ângulos desfavoráveis (fotografar muito baixo ou muito alto), excesso de bagunça, itens pessoais visíveis e edição exagerada que deturpa o imóvel. Usar um smartphone sem uma lente grande-angular e técnica adequada também é uma armadilha comum. Sempre se concentre na clareza, limpeza e uma representação precisa e atraente.